Tuesday, April 18, 2017
Final Phase 2 - Due 5/4/2017
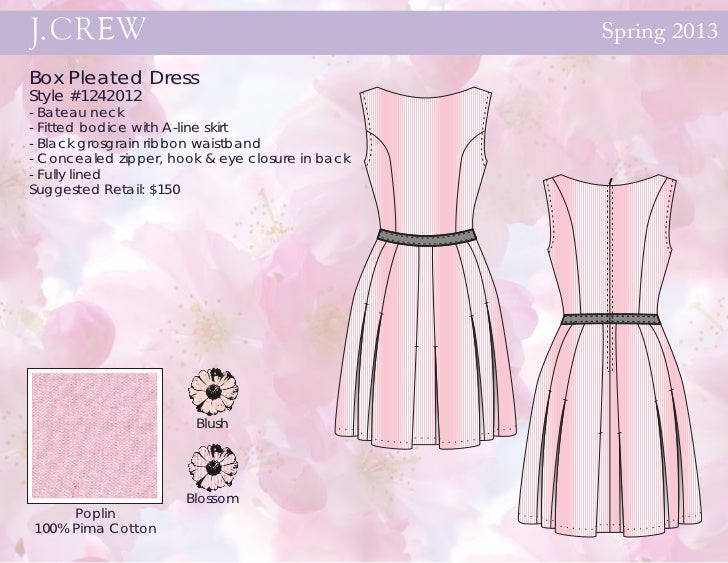
- Full color background
- Full color Illustrator Flat Sketch
- Fabric Sample
- Title of Dress w/Style Specs & Price
- Product Name/ Designer Name
- Season and Year
Final Phase 1 - Due 4/25/2017
- 11x14" Sheet/Board
- Full student name/Line name/Season and year printed on board
- Full color croquis
- Illustrator Sketch Front & Back
- Color Background
- Convert to PDF
- Print at Staples (Staples will print on 11x17 - Cut it down)
- Full student name/Line name/Season and year printed on board
- Full color croquis
- Illustrator Sketch Front & Back
- Color Background
- Convert to PDF
- Print at Staples (Staples will print on 11x17 - Cut it down)
- Cut out croquis /exacto knife
- Use glue stick to paste onto board with flat (see below)
Monday, April 10, 2017
New Homework Due 4/11/2017
Illustrate one dress in full croquis, in color, by hand, on bristol board or sketch paper. The paper needs to be thick enough that you can cut out with an exacto knife. Copy paper will not work.
We will translate this into flats in Illustrator.
Fashion Croquis
You can download and use them for your design if you need to.
We will translate this into flats in Illustrator.
Fashion Croquis
You can download and use them for your design if you need to.
Tuesday, March 28, 2017
Assignment # 4 SKIRTS - DUE 4/6/2017
Tools covered:
- Lasso Tool
- Reshaping Tool
- Layers Management
- Stroke Profiles
- Stroke Weight
- Convert Anchor Point
- Pivot Handles
- Pathfinder Tool
- Lasso Tool
- Reshaping Tool
- Layers Management
- Stroke Profiles
- Stroke Weight
- Convert Anchor Point
- Pivot Handles
- Pathfinder Tool
- Create new file on 11x14 inch artboard in Illustrator
- Review notes on skirt in text and video in class
- Create 1 Basic Gore Skirt (front and back)
- Create 3 additional skirts, variations in hem length, skirt sweep, skirt style, see below
- Label the Season, Year, and Line Name
Tuesday, February 21, 2017
Assignment #3 - Collared Shirts Due 3/7/16
Read pp. 61 - 75
Tools Covered:
- Align Tool
- Distribution Tool
- Arrange Tool
Tools Covered:
- Align Tool
- Distribution Tool
- Arrange Tool
- Create a new file that is 11x14.
- Go through tutorial on creating a collared shirt in class
- Create 4 uniquely designed collared shirts (no fabric swatches or color)
- One shirt MUST be a basic collared shirt
- Create front and back for all four shirts
- Label the concept for the board
- Label the season and year
Tuesday, February 14, 2017
PEN TOOL Variations and Symbol meanings
IMPORTANT: “The Pen Tool takes on different forms depending on what you’re doing when you’re using it.”
In my work and searches this is the best, if not the only simple explanation of how to use the Pen Tool. The entire post shown here is very comprehensive, a must for learning the Pen Tool in Photoshop, Illustrator, and other Creative programs.
Keep in mind Pen Tool shapes and positions have changed between software versions and are different for various software companies. None the less, the POINT of the pen, the tip, is the position of the line. In Adobe and other programs you can set a “Cross-Hair” style tip point.
Most do not need to memorize what each of these mean or do. Knowing there are differences as you work is an important “path” to using the complete tool set for learning on-the-job.
The link is here:
http://vector.tutsplus.com/tutorials/tools-tips/illustrators-pen-tool-the-comprehensive-guide/
For those who see the pen tool only in the tool bar, this screenshot shows SOME variations. If you understand these possibilities before using the basic tool, the concept of drawing can be simplified.
(Even this chart might not include all variations for the creative programs. There are selection arrow variations also. If you are aware of a link that shows ALL TOOL variations please add a comment. Thanks).
MORE variations and explanations:
Pen Asterick rev
Pen Tool with Asterisk
This is a starting point. Notice that the pointer has an asterisk next to it indicating that your next click begins a new path. Click to create the starting anchor point.
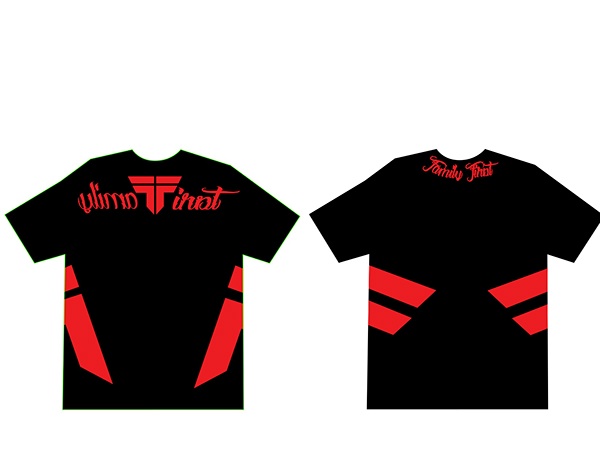
T-Shirt Board
Due 2/21/2017
1. Create 1 Board in Illustrator 11x14
2. Create 4 Basic T's in four color ways with Fabric Swatches (screenshots)
3. Label the Concept for the board
4. Label the season and year
5. Print to be critiqued in class 2/21/2017
Thursday, January 19, 2017
Guide to Fashion Flat Sketches Prezi - Intro to first project
FASHION FLATS DRAWING GUIDE <<< Click link
Fashion Flats Board - Due 2/2/2017
1. Draw fashion figure creating ONE look (Tracing paper can be used) - must be rendered in color
2. Draw 3- 5 flats creating the same look using tracing paper using 2H lead pencil
3. Create both the front and back of garment
4. Add details to flats before transferring onto sketchbook paper
5. Transfer onto sketchbook paper and ink sketches - Do not use ink until flats are approved by professor (Keep tracing paper flats - do not throw away!)
6. Use exacto knife to cut flats out to be mounted on 11x14 board - Do NOT use drafting board desks for cutting - we will go into B4 for this
7. Use exacto knife to cut out fashion figure and mount on 11x14 board
8. Mount inspiration pictures, flats, and fashion figure on board and give the look a name - get professor approval before securing to final board
Below are examples of what the final project should look like...
Tuesday, January 17, 2017
Additional Materials for Drawing Flats
Materials for Hand Drawing Flats
Pens:
- .005 for Silhouettes
- .003 for detailing
- .05 for shadow on buttyns, pockets, collars, etc.
Pencil:
- 2H lead pencil
Paper:
- Layout or copy paper
- Tracing Paper
Marker
- (for shading) 10% Cool Grey
Ruler
- 6" Transparent plastic
French Curve
Eraser
White Out Correction Fluid
Pencil Sharpener (Electronic Sharpeners are best)
Sunday, January 15, 2017
WELCOME TO TECHNICAL DRAWING
This is a project based class where students
will develop skills in drawing technical flats and computer aided design using
Adobe Illustrator. This course will
introduce sketching Fashion Flats according to Fashion Industry standards. Beginning with foundation abilities, each
project will build skills. The class
structure is primarily hands on – lab oriented and project bases, although
there may be assigned reading and some required writing. The projects will be supplemented with
lectures, demonstrations, videos, online research, fashion journaling and
critiques.
Subscribe to:
Posts (Atom)